### Introduction
Creating a drivers license template with gesture – controlled features can be an interesting and challenging project. Whether it’s for design practice, educational purposes, or exploring new ways of interaction, understanding the process is crucial. This guide will take you through the steps to create a USA – style drivers license template with the added functionality of gesture control.
### Understanding the Basics of a USA Drivers License
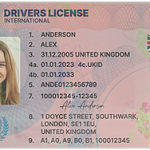
Before diving into the creation process, it’s important to know what a standard USA drivers license looks like. A typical drivers license contains several key elements:
– **Personal Information**: This includes the full name of the license holder, date of birth, address, and gender.
– **Photo**: A recent photograph of the licensee.
– **License Number**: A unique identifier for the license.
– **Expiration Date**: The date when the license is no longer valid.
– **Signature**: The signature of the license holder.
– **Security Features**: These can include holograms, microprinting, and UV – sensitive inks to prevent forgery.
### Designing the Drivers License Template
#### Step 1: Choose a Design Software
There are several design software options available, such as Adobe Photoshop, Illustrator, or free alternatives like GIMP. Each software has its own set of tools and features, but they all allow you to create high – quality graphic designs. For example, Adobe Photoshop is great for working with raster images, while Illustrator is more suitable for vector – based designs.
#### Step 2: Set Up the Document
When creating a drivers license template, you need to set the correct dimensions. A standard USA drivers license is 3.375 inches by 2.125 inches. In your design software, create a new document with these dimensions. You may also want to set the resolution to a high value, such as 300 dpi, to ensure a clear and sharp print.
#### Step 3: Add the Background
The background of a drivers license often has a specific color scheme and design elements. You can research actual drivers license designs to get inspiration for the background. You can use gradients, patterns, or solid colors to create a base for your template. Some licenses have watermark – like designs in the background, which can be added using transparency and layer effects in your design software.
#### Step 4: Incorporate Personal Information Fields
Create text boxes for each of the personal information elements mentioned earlier. Use a font that is similar to the one used on real drivers licenses. You can find information about the typical fonts used through online research. Make sure the text is clear and legible, and position the fields in a logical and aesthetically pleasing way on the template.
#### Step 5: Insert the Photo Placeholder
Create a rectangular placeholder for the licensee’s photo. You can add a border or some visual indication to show where the photo should be placed. The size of the photo placeholder should be in proportion to the actual photo size on a real drivers license.
#### Step 6: Add the License Number and Expiration Date
These elements are important for identification and validation purposes. Create separate text boxes for the license number and expiration date, and use a font that is consistent with the rest of the template.
#### Step 7: Include the Signature Field
The signature field can be represented by a simple rectangular area. You may want to add some guidelines or a light – colored border to indicate where the signature should be written.
#### Step 8: Incorporate Security Features (for Design Purposes)
Although this is just a template and not a real license, you can add some visual security – like features for authenticity. For example, you can create a simple hologram – like effect using layer styles and transparency in your design software. You can also add some microprinting – like text by using a very small font size in the background.
### Implementing Gesture – Controlled Features
#### Understanding Gesture Control Technologies
There are several ways to implement gesture – controlled features. One common approach is to use sensors such as accelerometers, gyroscopes, or cameras. For example, if you are creating a digital version of the drivers license template, you can use the built – in camera on a mobile device or computer to detect hand gestures. Another option is to use external sensors that can be connected to your device.
#### Programming the Gesture Control
If you are using a programming language like Python, you can use libraries such as OpenCV for computer vision – based gesture recognition. For example, you can write code to detect hand movements like swiping, pinching, or pointing. The code would analyze the video feed from the camera and identify specific gestures.
– **Swiping Gesture**: You can program the template to perform an action, such as navigating to the next page or section of the license information, when a swiping gesture is detected.
– **Pinching Gesture**: This could be used to zoom in or out on the license details, similar to how pinch – to – zoom works on a mobile device.
– **Pointing Gesture**: If the template is displayed on a touch – less interface, a pointing gesture could be used to select specific elements on the license, such as the photo or personal information fields.
#### Integrating Gesture Control with the Template
Once you have programmed the gesture recognition, you need to integrate it with the drivers license template. If you are using a software development framework like Unity or Flutter, you can import your designed drivers license template and then add the gesture – control functionality. For example, in Unity, you can create scripts that respond to the detected gestures and perform the appropriate actions on the template.
### Testing and Refining the Template
#### Testing the Design
Before adding the gesture – control features, it’s important to test the visual design of the drivers license template. Check for any alignment issues, font legibility problems, or color – contrast issues. You can print a sample of the template on paper to see how it looks in a physical form.
#### Testing the Gesture – Control Features
Once the gesture – control is integrated, thoroughly test each gesture to ensure it works as expected. Test in different lighting conditions if you are using a camera – based gesture recognition system. Check for any lag or delay in the response of the gestures. If there are any issues, go back to your code and make the necessary adjustments.
#### Refining the Template
Based on the testing results, make any necessary refinements to the design or the gesture – control functionality. This could include adjusting the position of elements on the template, improving the accuracy of the gesture recognition, or enhancing the visual appearance of the security – like features.
### Common Problems and Solutions
#### Problem 1: Difficulty in Finding the Right Font
– **Solution**: Conduct in – depth online research on official government websites or font – identification forums. Some websites specialize in identifying fonts used on official documents. You can also try using font – matching software that can analyze an image of a font and suggest similar ones. Another option is to contact design communities or professionals who may have experience with creating official – looking document templates.
#### Problem 2: Gesture Recognition Inaccuracy
– **Solution**: Calibrate the sensors regularly. If using a camera – based system, ensure proper lighting conditions and adjust the camera settings for optimal image quality. Refine the gesture – recognition algorithms by adding more training data. For example, if the swiping gesture is not being detected accurately, record more swiping movements in different directions and speeds and use them to train the algorithm. You can also fine – tune the sensitivity settings of the gesture – recognition system to make it more or less responsive depending on your needs.
#### Problem 3: Design Elements Not Aligning Properly
– **Solution**: Use the alignment tools provided by your design software. Most design software has features such as aligning objects to the center, edges, or other specific points. Double – check the measurements and dimensions of each element to ensure they are correct. If you are working with multiple layers, lock the layers of elements that are already in place to prevent accidental movement while you are adjusting other elements.
#### Problem 4: Compatibility Issues with Gesture – Control Technologies
– **Solution**: Check the documentation of the gesture – control technology you are using for compatibility information. For example, if you are using a particular sensor with a programming language, make sure the sensor’s drivers and the language’s libraries are compatible. Test the template on multiple devices or platforms if possible to identify and address any platform – specific compatibility issues. You may also need to update the software or firmware of the sensors or the operating system of the device to ensure proper functioning.
#### Problem 5: Security – Like Features Looking Unrealistic
– **Solution**: Study real drivers licenses in more detail to understand the exact appearance of security features. Use high – quality images of real licenses as references. Experiment with different design techniques in your design software to create more realistic hologram – like or microprinting – like effects. You can also consult with security design experts or professionals who have experience in creating secure document templates for advice on making the features look more authentic.
#### Problem 6: Slow Response Time in Gesture – Controlled Template
– **Solution**: Optimize your code. If you are using a programming language to implement gesture control, look for ways to reduce the computational complexity of your algorithms. For example, if you are performing a lot of image processing for gesture recognition, consider using more efficient image – processing techniques or libraries. Check the hardware specifications of the device on which the template is running. If the device is underpowered, the gesture – control may be slow. In such cases, you may need to upgrade the device or simplify the gesture – control functionality.
#### Problem 7: Difficulty in Integrating Gesture Control with the Template
– **Solution**: Review the documentation of the software development framework you are using. Make sure you understand how to import and interact with the template elements in the framework. Seek help from online developer communities or forums. There may be other developers who have faced similar integration issues and can provide solutions or tips. Break down the integration process into smaller, manageable steps and test each step as you go to identify and fix any problems early on.
#### Problem 8: Template Not Displaying Correctly on Different Devices
– **Solution**: Test the template on a variety of devices with different screen sizes, resolutions, and operating systems. Use responsive design principles if you are creating a digital template. This may involve using relative units of measurement (such as percentages instead of fixed pixels) for elements on the template. You can also create different versions of the template optimized for specific devices or screen sizes if necessary.
#### Problem 9: Fonts Not Rendering Correctly on Different Devices
– **Solution**: Use web – safe fonts or embed the font files with the template if it’s a digital version. Some operating systems and devices may not have certain fonts installed, so embedding the font ensures consistent rendering. Check the font – rendering settings on different devices and adjust them if possible. You can also use font – substitution techniques in your code to replace an unavailable font with a similar one.
#### Problem 10: Inconsistent Gesture Recognition Across Different Environments
– **Solution**: Consider the environmental factors that can affect gesture recognition. For example, if using a camera – based system, changes in lighting (such as bright sunlight or low – light conditions) can impact the accuracy. Develop algorithms or use techniques that can adapt to different lighting conditions. You can also add calibration steps for the user in different environments to improve the accuracy of gesture recognition. If using other sensors like accelerometers, account for factors such as device orientation and movement noise in different environments.
Fake ID Pricing
unit price: $109
| Order Quantity | Price Per Card |
|---|---|
| 2-3 | $89 |
| 4-9 | $69 |
| 10+ | $66 |